Friday, October 31, 2008

Compartments


Compartments have "Volume" as their primary attribute.

When a reaction has reactants in Compartment C1 and products in Compartment C2, then the rate of the reaction is multiplied by a DilutionFactor, which is C2/C1. This is handles by the ContainerTool plugin.

For example, in the image to the right, reaction rate for J0 is "J0.k0 * cell1.s1 * J0.DilutionFactor", where J0.DilutionFactor is "cell1/cells2"

Thursday, October 30, 2008

The Dot Operator

The dot is used to indicate parent-child relationships:

For example:
  • X.A   refers to the item A inside the item X. 
  • X.B.Concentration refers to the concentration attribute of the B that in inside X

X is probably a compartments or modules (currently, these are the only two items that can house other items). Compartments and Modules are implemented in the ContainerPlugin library (ContainerTools folder in the source code).

The name of A is still A, but the "full-name" of A is X.A. The full-name is used to uniquely identify the items. 

Always use full names:
  • Use full names in rate expressions:   0.5 * X.A   instead of   0.5*A
  • When trying to find items using C code:   model.find("X.A")  or  model.find("X_A")
Do not use the Dot where it does not belong:
  • Never name an item using a dot


When items change parents, the full-name can become an issue:

suppose there is an item A and another X.A (A inside X). If you move X.A outside X, then there will be two items named A. This is dealt with by automatically renaming the second A as A0 (or A1, A2, etc.). However, any such automatic behavior can be undone using the history window.

Currently, names such as X.A are converted to X_A when they are handed to a C function (because the dot would cause compile errors). This is done by the plug-ins providing the C functions, so it is the choice of the plug-in writer. 


Thursday, October 16, 2008

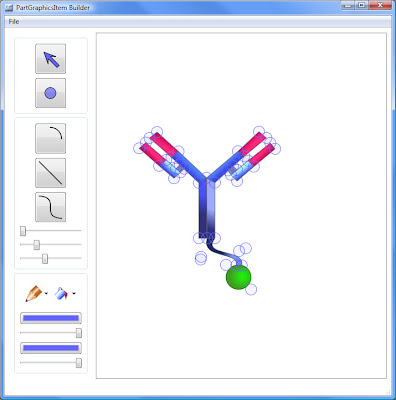
Make your own Parts!


Make your own part graphics using the PartGraphics application that comes with TinkerCell. The second video tutorial contains a small section on this program, but here is the basic idea:
  1. Place points on the screen.
  2. Connect points using lines, beziers, or arcs (arcs are a little strange).
  3. Make a closed polygon.
  4. Repeat steps 1-3 for all the polygons you want to make
  5. Color -- gradients and transparent colors are available, so be creative
  6. Save -- you will get two files: the xml file encoding that actual graphics and a png file that can be used as an icon.
Now you have two options:
  1. Open TinkerCell and use the "replace part graphics" button (next to the copy-paste button) to replace any of the parts on the screen with the file you just saved.
  2. Rename your part file with the same name as one of the items in the PartsTree.xml and place the file in the PartItems folder.
You can also use this program to edit existing files, such as Gene.xml or Regulatory.xml

Parts and Connections Tree


The parts tree and connections tree are loaded from two XML files. 

Inside your TinkerCell folder, take a look at PartsTree/PartsTree.xml  and PartsTree/ConnectionsTree.xml

The PartItems folder contains the files to draw each part. The PartsTree/Icons folder contains the icons for each part. 

To add a new item to the tree, just edit the xml file. If you do not provide an icon and/or a PartGraphicsItem with the same name, then the item will automatically get the same icon and graphics as its parent.

Wednesday, October 15, 2008

Connectors


In TinkerCell, connectors (Tinkercell::ConnectionGraphicsItem ) are represented as a list of "PathVector" (Tinkercell::ConnectionGraphicsItem::PathVector) items. Each PathVector is a set of points (Tinkercell::ControlPoint) and two arrow heads (Tinkercell::ArrowHeadItem). The arrow-heads can be null. If they are not null, the arrow heads are drawn at the start and end of each path vector. The path vector itself is a path defined by a set of points. The number of points is always a (multiple of 3) + 1 because they are drawn as Beziers. When drawn as straight lines ( Tinkercell::ConnectionGraphicsItem::LineType ), the connectors ignore every 2nd and 3rd point that define the Beziers. 

The connectors also have a middle region that is designed for implementing descriptors that can be placed in the center. This has not been implemented, but the connector has all the capabilities to implement it. 

The ArrowHeadItem derives from PartGraphicsItem, hence they can be drawn using the PartGraphics drawing program. 

Getting the connected Parts

The connectors do not store pointers to the parts they are connected to separately. Rather, everything is done directly. The first control point will always be a child item of a part item. This has a few nice benefits:
  1. the control point will automatically move with the part
  2. the control point's parentItem() method can be used to find the connected parts, thus preventing the need to store a separate list for connected parts
  3. the visual representation and the actual storage of connected parts is done simultaneously, thus there will be no synchronization problems
The connector class provides various functions, such as partAt(), replacePart(), parts(), controlPoints(), arrowHeadAt(), arrowHeads(), etc. If you look at the code for the class, you will see that all of these function only rely on the list of path vectors to get the information needed. 


Tuesday, October 14, 2008

Sample Plugin 1

Overview:

This is a generic template tool which places an empty docking window on the screen. It can respond to events such as when items are deleted, inserted, or when items intersect with each other. The tool can also respond to any of the signals in the main window or in any of the other plugins; I have just selected these for demonstration. 

If you want to use features from another plugin, you will need to check whether or not that plugin has already been loaded. If it has not been loaded, you will need to listen to the pluginsLoaded signal. Note how the collision detection plugin is detected using the pluginsLoaded function.

The very last function, loadTCTool, is what actually loads the plugin into Tinkercell. 

Loading the plugin into Tinkercell:

In order to compile and run the example plug-in, follow these steps:
  1. Download and install Qt toolkit.
  2. Download the TinkerCell source:                                                                                                svn checkout http://tinkercell.googlecode.com/svn/trunk/ tinkercell-read-only
  3. Create three files in your Tinkercell folder: MyPlugin.h, MyPlugin.cpp and MyPlugin.pro. 
  4. Copy & paste the code for each from this blog (below)
  5. Execute the following commands: qmake -config release MyPlugin.pro and make
  6. You can add the line "MyPlugin" to the DefaultLibraries.txt file.
  7. OR You can drag-and-drog the library file on TinkerCell's toolbar

CODE:

--------------------
MyPlugin.h
--------------------
#ifndef TINKERCELL_MYTOOL_H
#define TINKERCELL_MYTOOL_H

#include "Core/MainWindow.h"
#include "Core/GraphicsScene.h"
#include "Core/ItemHandle.h"
#include "Core/Tool.h"
#include "BasicTools/CollisionDetection.h"

namespace Tinkercell
{

 class MyTool: public Tool
 {
     Q_OBJECT

 public:
     MyTool();
     ~MyTool();
     bool setMainWindow(MainWindow * main);
     QSize sizeHint() const;
 public slots:
     void itemsSelected(GraphicsScene * , QList< QGraphicsItem* >& , QPointF point, Qt::KeyboardModifiers );
     void itemsRemoved(GraphicsScene * , QList< QGraphicsItem* >& , QList< ItemHandle* > &);
     void partCollided(QList< QGraphicsItem* >& , PartGraphicsItem * , QPointF , Qt::KeyboardModifiers );
     void pluginLoaded(const QString&);
private:
     void connectCollisionDetector();
 };

} //end namespace

#endif

#ifdef Q_WS_WIN
#define MY_EXPORT __declspec(dllexport)
#else
#define MY_EXPORT
#endif

extern "C" MY_EXPORT void loadTCTool(Tinkercell::MainWindow * main);


--------------------
MyPlugin.cpp
--------------------
#include "MyPlugin.h"

namespace Tinkercell
{

MyTool:: MyTool() : Tool(tr("My Great Tool"))
{
     //initialize your variables
}

MyTool::~MyTool() { }

bool MyTool::setMainWindow(MainWindow * main)
{
 Tool::setMainWindow(main);
 if (mainWindow)
 {
  connect(mainWindow,SIGNAL(itemsSelected(GraphicsScene*, QList< QGraphicsItem* >&, QPointF, Qt::KeyboardModifiers)),
    this,SLOT(itemsSelected(GraphicsScene*, QList < QGraphicsItem* >&, QPointF, Qt::KeyboardModifiers)));

  connect(mainWindow,SIGNAL(itemsRemoved(GraphicsScene *, QList < QGraphicsItem* >&, QList < ItemHandle* >&)),
    this,SLOT(itemsRemoved(GraphicsScene *, QList< QGraphicsItem* >&, QList< ItemHandle* >&)));

  QDockWidget* dock = mainWindow->addDockingWindow(name,this,Qt::RightDockWidgetArea);

  connectCollisionDetector();

  connect(mainWindow,SIGNAL(pluginLoaded(const QString&)),this,SLOT(pluginLoaded(const QString&)));

  return true;
 }
 return false;
}

void MyTool::pluginLoaded(const QString&)
{
    connectCollisionDetector();
}

void MyTool::connectCollisionDetector()
{
 static bool alreadyConnected = false;
 if (alreadyConnected || !mainWindow) return;
 if (mainWindow->tools.contains(tr("Collision Detection")))
 {
   QWidget * widget = mainWindow->tools[tr("Collision Detection")];
   CollisionDetection * collisionDetection = static_cast <  CollisionDetection* >(widget);
    if (collisionDetection)
    { 
      alreadyConnected = true;
      connect(collisionDetection,SIGNAL(partCollided(QList < QGraphicsItem* >& , PartGraphicsItem * , QPointF , Qt::KeyboardModifiers )),
          this, SLOT( partCollided(QList < QGraphicsItem* >& , PartGraphicsItem * , QPointF , Qt::KeyboardModifiers )));
    }
  }
}

void MyTool::itemsSelected(GraphicsScene * scene, QList < QGraphicsItem* >& items, QPointF , Qt::KeyboardModifiers )
{
    if (!scene || items.isEmpty()) return;
    //do something when items are selected
}

void MyTool::partCollided(QList < QGraphicsItem* >& movingItems, PartGraphicsItem * partHit, QPointF , Qt::KeyboardModifiers )
{
   if (!mainWindow || !partHit) return;
   GraphicsScene * scene = currentScene();
   if (!scene) return;

   ItemHandle * handle = getHandle(partHit);

   //do something when two parts collide
}

void MyTool::itemsRemoved(GraphicsScene * scene, QList < QGraphicsItem* >&, QList< ItemHandle* >& handles)
{
 if (!mainWindow || !scene) return;
 //do something when items are removed
}

QSize MyTool::sizeHint() const
{
    //set size of docking window
    return QSize(100, 300);
}

}


extern "C" MY_EXPORT void loadTCTool(Tinkercell::MainWindow * main)
{
   if (!main) return;
 
   if (!main->tools.contains("My Great Tool"))
   {
      Tinkercell::MyTool * mytool = new Tinkercell:: MyTool ;
      mytool->setMainWindow(main);
   }
} //end namespace


--------------------
MyPlugin.pro
--------------------

TEMPLATE = lib
DEPENDPATH += . debug tmp\rcc\debug_shared tmp\rcc\release_shared
INCLUDEPATH += . Core PartsTree BasicTools
CONFIG += release debug
unix:CONFIG += warn_off
RESOURCES   = Tinkercell.qrc
unix:LIBS += -L. -lTinkercell
win32:LIBS += Tinkercell.dll
mac:QMAKE_MAC_SDK=/Developer/SDKs/MacOSX10.4u.sdk
mac:CONFIG+=x86 ppc
# Input
HEADERS += MyPlugin.h
   
SOURCES += MyPlugin.cpp
   
QT += xml

The Plug-in Framework

A Plug-in in Tinkercell has much control over how the program runs. However, there is a suggested framework that it should follow in order to behave as a “good plug-in”.

Before designing your plug-in ...

  1. Feel comfortable with Qt’s signal/slot framework
  2. Look at all the signals and slots in the MainWindow class
  3. Look at all the functions in the GraphicsScene class
  4. Write down a list of features that you would like to add to TinkerCell

Things to know

  1. All TinkerCell classes belong in the Tinkercell namespace
  2. TinkerCell loads new plug-ins by looking for the function
loadTCTool(Tinkercell::MainWindow * main)

so be sure it is defined. See example (next blog)

Guidelines

  1. All Plug-ins inherit from the Tool class.
  2. Almost all the new features are added through the signal/slot framework.
  3. Avoid defining new graphics item classes unless necessary; for most cases, the signal/slot framework is easier.
  4. All non-trivial actions should have a QUndoCommand associated with it. When performing that action, you should add this undo command to the current scene’s history stack instead of directly performing that action. Note: since GraphicsScene provides most of the basic commands, many new commands can be constructed by using the CompositeCommand.
  5. Use GraphicsScene’s functions when possible. These functions automatically add undo commands to the history stack and send signals informing other plug-ins about the changes.
  6. If you do not use GraphicsScene’s functions, be sure to signal to the MainWindow whenever you make changes to items or their data. Do this in the setMainWindow method.
  7. Define new signals whenever you suspect that another tool might use it.


Class Hierarchy for items

The Graphical Items:


The Item Handlers and Families:


Monday, October 13, 2008

The Key Modeling Tools

The DataTools project file (and the library that is generated) contains the main classes that handle most of the modeling details:

  • BasicInformationTool: provides the "Numerical Attributes" and "Text Attributes" for each object. Inserts these tables when the "itemsInserted" signal is received from MainWindow
  • StoichiometryTool: provides the "Rates" text table and "Stoichiometry" numerical table for all connections. Inserts these tables when the "itemsInserted" signal is received from MainWindow.
  • ModelGeneratorTool: Small class with a single function that uses the above two classes to generate a C file containing the propensity function and parameter list.

parseRateString:

The StoichiometryTool provides this very useful public static function which uses the Mu Parser to parse a math equation. If any of the variables in the equation do not exist in the model, this function will automatically place those parameters into the "Numerical Attributes" table. And if any of the variables are partially complete, e.g. just k0 instead of J0.k0, this function will complete the correct parameter name.

The ItemHandle Class

The ItemHandle is a class that stores everything about a model object. 

The three important aspects of a model object are:
  • The graphics items, e. g. the part graphics item, text graphics items, etc. This allows more than one graphical item to represet the same model object, e. g. aliases, dimers, decorations. 
  • The item data: contains two hash tables, one for numerical data tables and one for text data tables. The hash tables store information relating to the model object. Some examples for the hash table keys are "Numerical Attributes", "Text Attributes", "Functions", etc. These tables are usually inserted into the objects by Tools (plug-ins).
  • Item family: classifies the model item as belonging to a particular family.  The two main types of families are PartFamily and ConnectionFamily
The following aspects of an object are more important for interface rather than defining a model object:
  • List of graphical tools associated with an object item. 
  • List of tools that are associated with an object item.
Each ItemHandle has one parent. Several convenient functions are available such as:
  • root(), which gets the top-most parent
  • parentOfFamily(), which gets the lowest level parent that belongs to the given family
  • setParent(), self-explanatory
  • isChildOf(), which checks if this item handle is a child of the given handle
  • isA(), which checks whether this handle belongs in the given family

The two main subclasses of ItemHandle are PartHandle and ConnectionHandle. PartHandle always has a PartHandle as a parent. ConnectionHandle always has a ConnectionHandle as a parent. 

Undo Commands

Undo Commands are part of TinkerCell Core's basic design

Undo commands all inherit from Qt's QUndoCommand class, so reading Qt's documentation on the undo framework first will be helpful. 

Undo commands are atomic operations, meaning that they can be undone and redone without causing side-effects. TinkerCell's general design is to define everything in terms of these atomic operations.  In otherwords, all edits to a model can be done using undo commands. 

The general way of using undo commands is to create a new undo command and then push() it to the current scene's history stack. GraphicsScene includes a large set of functions that automatically do this as well as emit the appropriate signal allowing other tools to respond to a command (see blog on GraphicsScene). 

The CompositeCommand is a very useful command. It allows multiple commands to be combined into one. For example, "paste" operation is a composite command that combines the insert command and the rename command (in order to rename newly inserted duplicates). 

The GraphicsScene Class

Summary of the GraphicsScene class:

This class inherits from Qt's QGraphicsScene class, so please read the Qt documentation on QGraphicsScene and QGraphicsView first.

  • Provides two important lists for tools to exploit: selected() and moving(), which gives a reference to the list of currently selected and currently moving items. The separation between what is selected and what is moving is important when items that are not directly selected, e.g. text items, need to move along. Further, tools can add or remove from both lists, giving tools control over selection and movement. Something to note is that items being moved are grouped into a QGraphicsGroupItem in order to make movement smoother. So, parent of an item will change as they are moved.
  • Other plugins can use the "actionsEnabled" Boolean value to turn on or off the default behaviors of the GraphicsScene. These default behaviors include selecting items, deleting items, etc.
  • Provides a large number of signals such as "itemsInserted", "dataChanged", "itemsAboutToBeRemoved", etc. It is usually not a good idea to connect directly to these signals, because each scene will have its own signals. Each of these signals are also available in the MainWindow class, and the MainWindow relays the signal from each scene. So connecting to MainWindow's signals is generally best unless specifically listening to a particular scene.
  • Has a history stack with stores a list of undo commands (see UndoCommands.h). User scene->historyStack->push( new command ) to execute a new command and place it in the history stack.
  • Provides a large number of convenience functions, eg. moveItems(...), changeData(...), remove(..), insert(...), and so on. Each of these functions do the following: generate an undo command (see UndoCommands.h), put the undo command in the scene's history stack, and send the appropriate signal, such as "itemsInserted" or "itemsAboutToBeRemoved", etc.

The MainWindow Class

Features of the MainWindow Class:

This class inherits from Qt's QMainWindow, so please see Qt's documentation as well.
  • Loads plug-ins (tools) by looking for and calling the "loadTCTools" function in a dynamic library that has been loaded.
  • Contains a hash table of tools with the tool name as the key. This is used by one tool to find another tool or to check whether or not the tools has been loaded.
  • Connects to each signal in a new GraphicsScene. Therefore, whenever any GraphicsScene sends a signal, MainWindow will relay that signal. This is so that a tool does not need to connect to every GraphicScene. Connecting to MainWindow is sufficient.
  • Provides several public menus, such as the file menu, edit menu, etc, so that tools (e.g. copy/paste tool) can add to them.
  • Provides two public menus: contextScreenMenu and contextItemsMenu, which are the context menus (right-click) that pop-up when nothing is selected (contextScreenMenu) or when items are selected (contextItemsMenu). Tools can add or remove actions to these menus in order to make options available in the context menu.  Standard practice is to connect to the itemsSelected signal and set actions to the context menu there. Tools should use addSeparator()  if they wish to make the their set of actions appear separately.
  • Provides two toolBars called firstToolBar and secondToolBar. The firstToolBar contains options such as save, open, new, close, etc. and the second does not contain anything by default. It is meant to be used by tools (e.g. plot window). However, tools may also have their own tool bars (most tools do this) and can add new toolbars to the main window (see Qt's QMainWindow documention).

The Core Library

The core library (Tinkercell.dll, Tinkercell.so, etc.) provides a very general framework for constructing anything with nodes and connections and information associated with each node and connection.

The plug-ins are built on the core library in order to provide a more complete set of features. The files in the BasicTools category provide most of the basic GUI features. However, some of the important features, such as plotting, are provided by other plug-ins. New plug-ins can be added in the same manner.

Main classes:

MainWindow

  • provides the main window for the application
  • stores a list of all plug-ins that have been loaded
  • has a set of signals that are used to communicate with the plug-ins
  • has multiple GraphicsScenes

GraphicsScene

  • draws all the items on the screen
  • has a history stack associated with it
  • has a set of signals that are used to communicate with the MainWindow
  • has various simple functions such as moving, inserting, deleting, etc.

Graphical items:

PartGraphicsItem

  • defines how to draw a single node (basically a set of polygon shapes)
  • can be stored in xml format

ConnectionGraphicsItem

  • defines how to draw a single connection (basically a set of paths and arrow-heads)
  • can be stored in xml format

TextGraphicsItem

  • defines how to draw text

ControlPoint

  • Used by PartGraphicsItem and ConnectionGraphicsItem to provide users with a point that can be moved

Data associated with graphical items:

ItemHandle, PartHandle, ConnectionHandle

  • Each part and connection (and most of the text items) item has a handle
  • A Handle brings together an item with its data and associated tools

ItemFamily, PartFamily, ConnectionFamily

  • Each handle has an associated family
  • Family is used to identify the “type” of a node or connection

ItemFamily, PartFamily, ConnectionFamily

  • Each handle has an associated family
  • Family is used to identify the “type” of a node or connection
  • Family also contains annotation information

Plug-in support

Tool

  • A very general object that usually belongs inside the MainWindow
  • Parent class for all the plug-ins

GraphicalTool

  • A graphics item that pops up when associated items are selected
  • Used to trigger a tool’s response

LibraryThread

  • A class for running C dynamic libraries as separate threads
  • InputWindow allows you to add an interface to a C library
  • OutputWindow allows you to display output from a C library

ProcessThread

  • A class for running processes as separate threads

File reading and writing

ModelReader and ModelWriter

  • Read and write handles, respectively

PartGraphicsItemReader and PartGraphicsItemWriter

  • Read and write PartGraphicsItem, respectively

ConnectionGraphicsItemReader and ConnectionGraphicsItemWriter

  • Read and write ConnectionGraphicsItem, respectively